Roll up your sleeves for spark plug inspections
Part II: Spark plug removal and inspection
 In our last article, we reviewed the importance of maintaining your aircraft’s spark plugs. Now, let’s roll up our sleeves and get into the how-to of doing the job yourself.
Preventive maintenance is always the key to safe and sensible aircraft operations, and 14 CFR Part 43, Appendix A specifically calls out spark plug maintenance as legal preventive maintenance. This means that the owner or operator of the aircraft is legally permitted to replace, clean, and set the gap of the aircraft’s spark plugs.
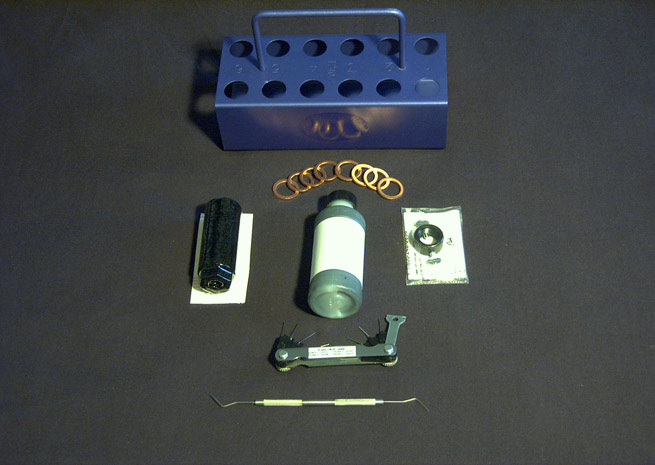
Before you begin, it’s important to make sure that you have the proper tools at hand. You’ll need a calibrated torque wrench, open-end wrenches, a spark plug socket and driver, a spark plug tray, gapping tool and gauge, spark plug anti-seize, and new spark plug gaskets. A dental pick and access to a spark plug cleaner are also helpful. You can cut corners by annealing the old gaskets and using automotive high-temp anti-seize, but the right tools and supplies are inexpensive, so it doesn’t make sense to take shortcuts.
Once armed with the right tools, let’s get to work. Make sure the magnetos are off and work your way through the cylinders. Start at the No. 1 cylinder and remove the ignition lead connectors. You don’t want to twist the wire during removal or installation, so always use two wrenches when removing or tightening ignition wire connectors. A three-quarter-inch wrench will work on five-eighths-inch barrel plugs, and a seven-eighths-inch wrench will work for three-quarter-inch barrel plugs. For the small hexes, use a seven-sixteenths-inch wrench.
 Once the lead has been removed from the sparkplug, carefully inspect the wire terminal ends, especially the contact springs. Clean the springs carefully, and if you find a broken or corroded spring, the spring should be replaced. Now that the wire is out of the way, use your spark plug socket to remove the plug. Carefully remove the plug and place it in a plug tray. A plug tray is important to use because it has a specific hole for each plug to keep the plugs organized and protected. This makes identification, inspection, and rotation a simple affair and reduces the chances of a dropped plug. If you happen to drop a plug, always throw it away. Dropping a plug can easily damage the ceramic insulator, and it’s simply not worth taking the risk.
Once all of the plugs have been removed, take the tray over to the workbench for inspection and cleaning. Each plug should look about the same. They should be dry and light brown or gray without any heavy deposits. If the plug has lead fouling, you will see dark-gray deposits clogging up the insulator and electrode. If your plugs have lead fouling, you should consider leaning more aggressively, especially on the ground. Switching to fine wire plugs are also a good option. Despite ground-leaning, I was fouling plugs occasionally in my Bonanza before I tried switching to Tempest fine wire plugs. Since then, it’s never been an issue.
Fine wire plugs are more expensive than massive plugs, but they have several advantages, including reduced maintenance (no gapping required), longer life, and improved efficiency on high-performance aircraft. If you have had lead issues, fly a high-performance aircraft, and/or intend on keeping your aircraft for a while, fine wire plugs can be an excellent investment.
If your plugs have light gray or white electrodes, they may indicate an overly-lean condition. This can be a result of overly aggressive leaning, a clogged injector, or an air-induction leak. If your plugs have an excessive amount of soot, your engine may be running overly rich. Lastly, if you find a plug that is black and oily, you probably have oil leaking past the cylinder rings. This is a common problem in high-time engines and might also show up as low compression during the annual inspection. If you find any of these conditions, check with your mechanic to decide if you should pursue the issue further.
Next time, we’ll clean the plugs, set the gap, and get that airplane back into the air!
![]() Jeff Simon is an A&P mechanic, pilot, and aircraft owner. He has spent the last 14 years promoting owner-assisted aircraft maintenance as a columnist for several major aviation publications and through his how-to DVD series: The Educated Owner. Simon is also the creator of SocialFlight, the free mobile app and website that maps more than 5,000 aviation events. Free apps available for iPhone, iPad, and Android, and on the Web at www.SocialFlight.com.
Jeff Simon is an A&P mechanic, pilot, and aircraft owner. He has spent the last 14 years promoting owner-assisted aircraft maintenance as a columnist for several major aviation publications and through his how-to DVD series: The Educated Owner. Simon is also the creator of SocialFlight, the free mobile app and website that maps more than 5,000 aviation events. Free apps available for iPhone, iPad, and Android, and on the Web at www.SocialFlight.com.