In range
Visualizing the line that separates the attainable from what’s out of reach

Jargon: Speed to Fly
Sometimes best glide speed isn’t best. In calm winds, best glide speed will get you the most forward distance for a given altitude loss—but a headwind lowers your groundspeed and steepens the descent angle. Sailplane pilots use the concept of “speed to fly” to maximize forward distance: With a headwind, speed to fly is faster than best glide speed; with a tailwind, it’s slower.
Finding best glide speed (quickly)
Look at the wing
 Your airplane’s best glide speed (VG) isn’t marked on the airspeed indicator. It’s usually halfway between best angle (VX) and best rate (VY) of climb. But how can you quickly and accurately figure out and fly that speed during an engine-out emergency that also requires you to perform many critical tasks, including look outside and select an off-field landing site?
The quickest shortcut to find best glide is to simply fly level.
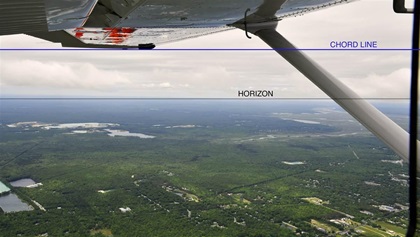
When the chord line of the airplane’s wing is parallel to the horizon, the airplane is in an attitude that maximizes lift and minimizes drag—and Max L/D is the actual definition of best glide speed.
If you’re flying fast when the engine quits, flight instructors will typically want you to pitch up and climb to your best glide speed—and doing so can certainly help gain some quantity of altitude. But if you’re in a typical fixed-gear, single-engine trainer, that amount of altitude will be minimal.
In an actual engine-out emergency, by the time you establish a level pitch attitude and adjust the elevator trim to stay there, your airplane is likely to be at, or very near, best glide speed.
After that, you can pitch up slightly, typically to your best angle of climb speed (VX), to minimize sink and maximize the amount of time you remain aloft while sacrificing some distance. Or you can stay at VG to prioritize distance—but make sure while doing so that you’re traveling in the direction you want to go.
Somewhat surprisingly, the distance your airplane can travel at VG doesn’t change with aircraft weight. Optimum glide angle and distance remain the same. The difference is that VG increases at heavy weight and decreases at light weight. So you’ll get to the same touchdown point more quickly at heavy weight—but the point itself doesn’t vary. —Dave Hirschman
Jargon: L/D ratio
Lift to drag ratio is the lift of an airfoil compared to its drag. Highly efficient wings like those of sailplanes have high L/D ratios, whereas draggier airplanes have lower ratios. What we commonly call “best glide speed” is where total drag is at a minimum and the L/D ratio is at its highest—L/DMAX.
Pilots who frequently rely on attitude flying have a picture in their mind’s eye for everything. Common ones are the climb attitude, the stabilized approach picture, the steep turn position, and the full stall attitude—which is particularly important for tailwheel pilots. Experienced attitude flyers have learned the correct image of the airfield when they are set up properly for a constant glide angle to the runway. Their visualization is based on the lift to drag ratio (L/D) of their aircraft, and the idea of a glide line is tied to this concept.
Langewiesche explains that the glide line is formed by the angle from the horizon line to the pilot’s eye, then from the pilot’s eye to a fixed point on the ground below the horizon line. This angle depends on the aircraft, weight, and wind condition. If the fixed point on the ground is extended as a line parallel to the horizon line, Langewiesche calls it the glide line.
As the height of the aircraft changes, the relative sizes and positions of other ground features will change, but the distance between the glide line and horizon line remains fixed. This is because the eye level of the pilot establishes the horizon line. As the airplane and pilot descend during a glide, the relative position of the horizon line descends with the pilot’s eye, and when the descent is at a constant angle, the relative positions of the glide line and horizon line are constant. Pilots can use this idea on the approach for landing by comparing the location of the glide line with the position of the runway and surrounding obstructions. If the target is above the glide line, then the aircraft is too low to reach it, and it’s the opposite if the spot is pictured below the glide line. The glide line position must be adjusted according to wind conditions or other variables, but it makes a good general reference. When the landing spot does not move from its relative position, then the pilot has confidence that the approach is stabilized and the field can be made.
All aircraft have a given best glide angle. It can be a moderate angle like the Cessna 150 at about 7 degrees, to a steep angle of 15 to 20 degrees for airplanes that don’t glide as well; or it could be extraordinarily shallow, at less than 3 degrees for gliders. Regardless, all have an angle that can be pictured from the pilot’s point of view as a glide line below the horizon. The glide line will be closer to the horizon for the shallow glide angles and farther away for the steeper ones.
The glide line picture is affected by wind conditions and the weight of the airplane. Flying into a headwind slows the aircraft’s groundspeed, causing a steeper descent angle, and so the glide line moves further down from the horizon line; this could mean a spot that was within glide range with no wind now lies above the glide line and can’t be reached. Possible adjustments could include adding power, or in a power-off glide, the pilot may choose to increase airspeed if practical. It is common practice for glider pilots in this situation to increase their glide speed by adding half the estimated wind velocity to compensate for the wind’s effects. For instance, an aircraft with best glide angle speed of 70 mph may need to glide at 75 if the head wind component is estimated at 10 mph. This adjustment more or less returns the glide line to the no-wind view.
The glide line picture will change some according to the weight of the airplane, too. Although the L/D ratio is independent of weight, it will be necessary to glide faster when the airplane is heavier in order to increase lift enough to achieve the optimum glide angle. For example, the maximum glide angle may require 70 miles per hour for an airplane loaded with one person, but must be increased to about 77 when two are on board.
Pilots instinctively understand the glide line relationship, especially when gliding on final approach for a simulated engine-out landing at a familiar airport. After dozens of landing approaches, the picture of the runway when the airplane is at the right altitude and glide angle is fixed in the pilot’s memory; the location of the glide line becomes intuitive. But when faced with a strange location, or when flying an unfamiliar aircraft, the glide picture is not so automatic. In these situations, taking time to gain familiarity with the glide line of a different aircraft could be an advantage.
Flight instructors who focus on attitude flying often use a training aid to help visualize the glide line and other attitudes. They may place pieces of tape or a mark on the windscreen to help the student identify proper attitudes for climb and for the glide line or a powered approach to landing. When the applicable flight attitude and speed are correct, the instructor will line up the tape with the student’s view of the horizon line and glide line, and then apply it to the proper position on windscreen.
When descending at a constant angle, the relative positions of the glide line and horizon line are constant.
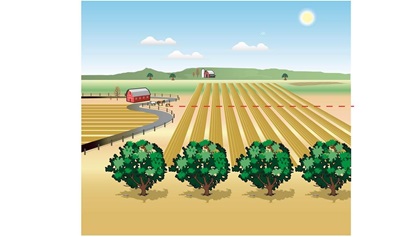
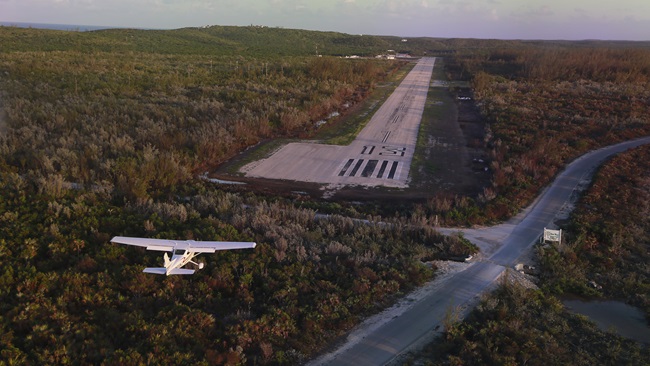
Can the pilot make it beyond the trees? Visualizing the glide line for your airplane can help you determine which landing sites are within range. Anything above the glide line is out of reach. In this case, the airplane could touch down beyond the trees.

In a steady glide, the trees move down and the far end of the field moves up—but the relative positions of the horizon and the glide line remain stationary. If a reference point moves up in the windscreen, you will undershoot it; if it moves down, you’ll overshoot.
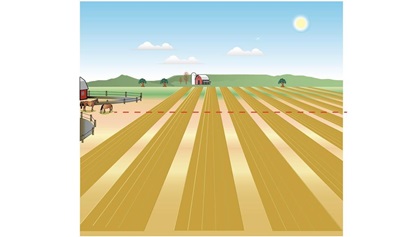
The angular distance between the horizon and the glide line remains fixed, even close to the ground.
Illustrations by Steve Karp

Another method that is often used to establish the glide line is the use of a ruler or small dowel, such as a pencil. Initially the exercise should be done in light wind conditions if possible. First, the best glide angle is set up with no power at the proper speed for best glide. Then, by holding the measuring stick vertically at some fixed distance in front of the eye, perhaps at arm’s length, the pilot can line up the tip of the stick with the horizon line. Finally, by visualizing where the glide angle intersects the ground and converting it to a vertical distance between the horizon line and the glide line, the pilot can mark the gap between them by placing a thumb at the point on the stick where the glide line crosses it. Now the pilot is holding the measurement of the fixed distance between the horizon and glide lines. As the descent continues at best glide angle, the view of objects in the windscreen will change, but the distance of the glide line below the tip of the stick will not change. Everything below the pilot’s thumb is within gliding distance, and anything above it is out of reach.
In the event of an engine failure, anything above the glide line can be ignored.Many glider pilots who habitually fly the same aircraft keep a small dowel with permanent marks on it in the cockpit. Others use parts of their hand, like a thumb or a couple of joints of a finger. They have determined the glide line location on the stick or their hand for no wind, and for different headwind velocities, such as 10, 20, and 30 knots. When faced with an unfamiliar landing situation, they can line up the tip of their measuring aid with the horizon to get a quick picture of what spots are candidates for landing and which ones are beyond practical gliding distance.
In a headwind situation, it’s important for pilots to remember to apply forward pressure on the elevator control when they want to extend the glide. New pilots in particular often must resist the natural reaction to hold off the airplane with back-pressure. Back-pressure accomplishes the opposite effect. Groundspeed is reduced when the pilot pulls instead of pushes, so the glide angle becomes steeper, the glide line drops farther below the horizon line, and unobtainable distances can quickly fill the windscreen view.
The same effect applies for the weight of the airplane. The pilot should apply forward control pressure to carry more speed in a glide when the aircraft is heavy. The extra weight means a higher speed is needed to achieve the optimum angle-of-glide speed, according to the aerodynamic design of the airplane. Glider pilots are usually prepared, because few gliders have more than two seats, so the best glide speeds are memorized for solo and dual situations. More complex airplanes may require more planning than this, but the concepts and control responses are important to remember when needed.
The concept of the glide line is not only interesting but also can be a practical aid for pilots who want to polish their skills at setting up a stabilized approach. By configuring the airplane for best glide speed with the glide line pictured across the runway, the pilot can watch the size of the runway grow while the distance between the glide line and horizon remains constant. If the touchdown point moves above the glide line, then slight forward pressure or a touch of power will be needed to put the glide line above or even with the touchdown target.
In an emergency situation with no airfield around, pilots who know the glide line sight picture for their aircraft can rapidly determine how far their aircraft can glide. Anything above the glide line can be ignored. It quickly reduces the apparent number of options and allows valuable time for making other emergency decisions.
The glide line concept is an old idea that has been used for training since the early days of aviation. It still can be applied and used. It’s worth adding to a pilot’s toolbox.
Frank E. Cahill is a certificated flight instructor living in Missouri.
Frank E. Cahill
Related Articles