Engine Basics
Safety Spotlight: Aircraft Systems


Aircraft engines are extremely reliable when properly cared for and can deliver years of safe flight. That being said, not all pilots know as much as they should about the proper care and maintenance of engines.
Whether the aircraft you fly is equipped with a sophisticated engine monitoring system or not, a basic understanding of how engines work is required to correctly diagnose potential engine problems. For all engines, air is drawn into the engine, mixes with fuel, burns at a controlled rate and expands, pushing on a piston that turns the crankshaft and propeller.
In most piston aircraft, this occurs in four cycles: intake, compression, power, and exhaust. Cockpit engine controls—usually the throttle, prop control and mixture—allow a pilot to extract the most efficient performance from the engine and ensure safe and reliable operation.
Tip: Knowing how to manage a powerplant helps you fly more safely and can minimize the cost of flying.
Magnetos
Aircraft engines have two spark plugs in each cylinder to improve combustion efficiency and to provide a backup in case one ignition system fails. Feeding the spark plus are two magnetos, each of which is self-contained and creates the spark, all without an external electrical source. If one magneto fails, the aircraft will still fly safely on the other magneto and its set of spark plugs.
In your car, if the electrical charging system fails or the ignition is turned off, your engine stops running. In an airplane, the electrical system can be turned off with the master switch and the magneto-equipped engine will continue running.
Throttle
The throttle is an air valve, opened all the way for full power and closed almost completely at idle. In a carbureted engine, as the throttle is opened further and further, more and more fuel is automatically drawn through the carburetor. The fuel and air combine in the carburetor throat and are sucked into the cylinder via intake tubes. Carbureted engines are susceptible to developing carb ice.
In a fuel-injected engine, the pilot still controls the volume of air entering the engine by moving the throttle, but the fuel is delivered separately into each cylinder, mixing with the air inside the cylinders. Fuel-injected engines are more efficient and develop more power than the same-size carbureted engine because of more precise fuel delivery.
With fuel-injected engines, there is no worry about carb ice, because there is no carburetor in which the fuel-air mixture can vaporize and cool. The main operational difference with fuel-injected engines is that they can be harder to start, especially when hot.
Carb Ice
When we think about the dangers in icing, the first thing that comes to mind is usually airframe ice—but carburetor ice, its insidious and often forgotten cousin, can be just as deadly. As with most risks in flying, though, the keys to combating carb ice are simple: understanding the danger, recognizing the symptoms, and taking prompt action.
At a basic level, carburetor ice is a product of three inter-related factors:
- Air temperature
- Relative humidity
- Carburetor design
 The carburetor’s job is simple: It blends fuel and air together in the correct ratio before sending it to the engine in the proper quantity. To do this, it draws air through a narrow, curved passageway called a venturi. Much like air flowing over the curved upper surface of a wing, air moving through a venturi speeds up as its pressure decreases. When fuel is injected into this fast, low-pressure airstream, it vaporizes, and the resulting mixture of atomized fuel and air flows to the cylinders.
No aircraft with a carbureted engine is immune to carb ice.
But there’s a problem. The vaporization of the fuel and the pressure change induced by the venturi together cause the air passing through the carburetor to cool rapidly—in some cases, by as much as 70 degrees Fahrenheit (F). If this lowers the air temperature past the freezing point, and if the incoming air is moist (i.e., humid) enough, ice can begin to form on the inner surfaces of the carburetor. As the ice accumulates, it restricts the flow of the fuel/air mixture to the engine, leading to a reduction in power as the engine is essentially “starved.” If the situation isn’t remedied, the engine may lose power entirely.
The “Danger Zone”
Although you may have heard that only a specific set of conditions lead to carb ice, the truth is that most of us fly inside the “danger zone” on a regular basis.
Carb ice can form over a wide range of outside air temperatures and relative humidity. While the word “icing” typically suggests blustery winds and frigid conditions, carb ice can form when outside temperatures are as high as 100 degrees F with 50 percent relative humidity. At the other end of the spectrum, the risk doesn’t go away until the humidity falls below roughly 25 percent and/or the outside air temperature drops well below freezing.
In other words, carb ice can form at pretty much any time, in any phase of flight.
Flight Conditions
 Of course, just because carb ice can form over a wide range of temperatures doesn’t mean that it always will. Certain situations are considerably riskier than others. Icing is most likely to occur—and to be severe—when temperatures fall roughly between 50- and 70-degrees F and the relative humidity is greater than 60 percent.
Likewise, certain flight conditions carry greater risks. As engine power is reduced, airflow is restricted, and ambient heat is lessened. This makes low-power operations like descents considerably more prone to carb ice. Certain aircraft types are also more prone to ice than others because of differences in airflow and engine heat due to cowling design and other factors. Check your POH for guidance on carb heat, and remember that no aircraft with a carbureted engine is immune to carb ice.
Diminishing Returns
The classic symptoms of carb ice are reduced power and a rough-running engine. In aircraft with fixed pitch propellers, the first indication is typically a small decrease in engine rpm. Although the engine may still be running smoothly at this point, as ice continues to accumulate the reduction in rpm will continue and the engine will begin to run rough. If the icing conditions are severe enough and the pilot takes no remedial action, the engine will eventually fail.
The same applies to airplanes with constant-speed propellers, with one important exception: The manifold pressure gauge, rather than the tachometer, should be the focal point for early indications of carb ice. Precise power settings, a consistent instrument scan, and attentive ears can all alert you to the subtle changes in engine performance. You may also want to consider installing a carburetor air temperature gauge to assist in recognizing conditions conducive to icing.
Tip: If you listen to music in flight, make sure the volume is low enough to hear any changes in engine RPM.
The Remedy
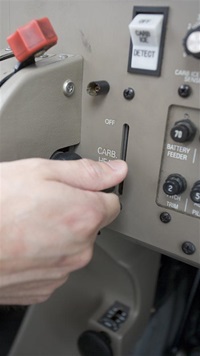
Although carb ice can form any time, under any number of different circumstances, the remedy is always the same: carb heat. Consult your airplane’s POH or flight manual for specifics on using carb heat but remember this general rule: It’s far better to use full carb heat too soon, than to wait until it’s too late.
When you apply carb heat, unfiltered air that’s been heated by the exhaust manifold routes into the carburetor, melting any ice that may have formed. As the ice melts, water intermixes with the fuel/air mixture, causing the engine to run rough. Be patient: This increased engine roughness may last several seconds to a few minutes as the ice melts. Once the ice is clear and the engine is operating normally, be sure to turn off the carb heat to restore full power.
Preventive Steps
During your preflight run-up, apply carb heat fully to ensure that it’s functioning properly. As warm air routes to the carburetor, you should see and hear a small reduction in rpm on aircraft with fixed-pitch propellers, and a slight reduction in manifold pressure for those with constant-speed props. If no ice is present, the rpm or manifold pressure will remain constant. If ice exists, however, there will be a gradual increase in engine power as the water from the melting ice is purged from the system.
If much time elapses between the carb heat check and takeoff (especially in conditions conducive to carb icing), you may want to consider performing another check just prior to departure. Carb heat should not be left on while taxiing, however, because the unfiltered air could allow foreign debris to be introduced to the engine.
Before reduced or idle power operations, apply full carb heat (unless the aircraft’s POH states otherwise). The warm air will aid in the prevention of carb ice—as will an occasional application of throttle to clear the engine. Again, it’s best to err on the side of caution when it comes to carb ice.
In extreme cases of in-flight ice, it may be necessary to operate with continuous full carb heat to prevent further ice formation. In this case the mixture should be leaned to compensate for the warmer, less dense intake air, which can cause an excessively rich fuel/air mixture.
Wherever your flying takes you, always be aware of the “danger zone” of carb icing. Preflight prevention, alertness to early indications and a prompt, correct response to carb ice will keep you safely in the air—and out of the NTSB accident database.
Getting Started
Carbureted Engines
 Many piston engines will start with the mixture rich, throttle advanced slightly, and fuel pump "On". Still, starting an airplane engine isn’t automatic, as it is in a car.
To start a cold engine, add extra fuel by priming. This puts fuel directly into one or more cylinders (via the intake manifold). Refer to the aircraft’s POH for the correct priming technique. Do not pump the throttle, as this will simply force raw fuel (which doesn’t vaporize as easily in cold weather) into the intake system, possibly causing an engine fire.
If the outside temperature is below 20 degrees F, the engine may need a preheat, both to aid in starting and preventing engine damage. During a cold start try to avoid draining the battery unnecessarily. Leave avionics, electric flaps, and aircraft lighting—which all rely on and use battery power—off until the engine is running.
Fuel-Injected Engines
Fuel-injected engines use electric primers or the electric fuel pump to spray fuel into the cylinders for priming. In some airplanes, the amount of primer fuel is adjusted by advancing the mixture and the throttle. It's easy to over-prime the engine, in which case the flooded-start procedure will be needed.
A typical flooded (or hot-start procedure) for a fuel-injected engine begins with the mixture at idle cutoff. Next, move the throttle to the open position (full power). Check the POH to see if the fuel pump needs to be On or Off. While cranking the engine, get ready to reverse the throttle and mixture controls as the engine starts (quickly retard the throttle and slowly richen the mixture). It takes some practice to gracefully hot-start a fuel-injected engine.
Tip: Different engine manufacturers have different procedures for hot starts. Be sure to reference the POH for the aircraft you fly.
Safety Tip: Hot Starts
Do you struggle with hot starting an airplane? You’re not alone. In this video, we help demystify hot start procedures, and give you a peek at what’s happening under the hood—in your airplane’s fuel delivery system.