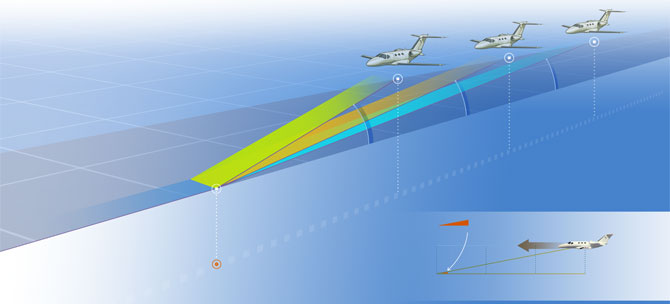
From Top of descent (TOD) to bottom of descent (BOD) for three different descent angles. For a two-degree vertical path, the descent begins 120 nm from BOD—in this case, the MCI VOR. A normal, three-degree vertical path calls for the descent to begin 90 nm away, and for a five-degree path TOD is a mere 45 nm from MCI. Rules of thumb (below right) call for TOD to begin by the altitude to be lost—in thousands—multiplied by three.
Photography by Mike Fizer
June 2012
Turbine Pilot Contents
- Quick Look Dassault Falcon 20.
- System Synopsis Power control units.
- What's Your Type? Type rating basics.
- VNAV 101 Vertical navigation in light jets.
Energy management in jet aircraft is one of the challenges transitioning pilots frequently struggle with. In both the terminal and en route environments, preventing excessive energy build-up, in the form of potential energy (too high) or kinetic energy (too fast), is an important task. Because the groundspeeds and altitudes typical of jet flight are so much greater than those encountered in propeller-driven aircraft, staying on top of en route descent profiles requires proactive planning. As an illustration of the numbers involved, a typical light jet flying at 41,000 feet in a 100-knot tailwind, and wanting to execute a 1,000-foot-per-minute descent, would need to begin descending 300 miles from its destination—a lot farther away than where many new jet pilots are starting to think about descending.
Fortunately for pilots, all new light jets are delivered with navigation systems capable of sophisticated vertical navigation (VNAV) planning and execution, and with autopilots that can couple to the resulting guidance for hands-off descents. But as is the case with all automation features, thoroughly understanding the details of VNAV operation is critical to extracting maximum benefit from the system. Just as many pilots don’t move far beyond “direct-to” with IFR GPS units, many jet pilots don’t move beyond the simplest VNAV functions, leaving helpful advanced features unexplored.
Fundamentally, the VNAV systems found in light jets actually are fairly simple, working from a combination of GPS and barometric altimeter inputs. When a VNAV descent profile is loaded, the system compares the actual aircraft height against the desired height for the current position. The relationship between the two is displayed on the primary flight display (PFD) in the same manner as a glideslope signal; if the aircraft is lower than expected, the “dot” is above the center of the display, if too high, the “dot” is below the center. Enabling autopilot VNAV mode simply makes the autopilot track the VNAV profile as if it were a glideslope—if the aircraft is below the dot, the autopilot will command pitch up, and vice versa.
Simple in theory doesn’t always equate to simple in operation, however. The various methods in which VNAV can be used, as well as associated terminology, require some study for full mastery. Starting with a basic use of VNAV, imagine a light jet cruising at Flight Level 400 (40,000 feet pressure altitude) receives clearance to cross the ABC VOR at 12,000 feet. What the controller is saying is that it doesn’t matter when the airplane leaves FL400, or how fast it descends, as long as the airplane is at 12,000 feet by the time it reaches ABC.
The first step to enable VNAV execution of the clearance is inputting the associated altitude in the flight plan abeam the appropriate fix. This creates a three-dimensional point (latitude, longitude, and altitude) that will “anchor” the VNAV profile, sometimes called bottom of descent (BOD). The other anchor point, called top of descent (TOD), will be along the aircraft’s flight plan, at the aircraft’s current altitude. The exact position of TOD depends on how steep a profile the system computes. Most VNAV systems default to a three-degree profile and allow pilot selection of profiles between zero and six degrees.
 One of the big problems with steep descents to the bottom of descent (BOD) point is building too much airspeed on the way down. Here, airspeed has reached barberpole values, sounding an overspeed warning. Without reducing power, deploying speed brakes, and/or landing gear—or all of those—airspeed will go deeper into redline territory. In this case, the pilot has reduced his rate of descent to help bleed off airspeed (note that the flight path is now above the highway-in-the-sky guidance boxes).
Why the variable slopes? It all depends on what the pilot needs to accomplish. For maximum fuel efficiency, you want to stay at high altitude as long as possible, followed by a steep descent at idle thrust. Other times, starting down earlier with a relatively shallow descent may be desirable, resulting in faster groundspeeds.
Whatever the profile, it’s important to understand that VNAV systems are always thinking in terms of angles. This causes some confusion, as Garmin systems allow for creating a profile based on vertical speed. However, the system is converting the programmed vertical speed into an angle, based on current groundspeed. This can cause confusion when a pilot tells the system that a 1,500-fpm descent is desired, and then sees that the aircraft actually is descending at 2,000 fpm on the VNAV profile.
So what happened? Between programming and executing the profile, the aircraft has accelerated because of a power change or tailwind increase, and then once the descent began, groundspeed increased further. Because the VNAV angle remains fixed once programmed, the aircraft must descend at a higher vertical speed to maintain the VNAV path. Pilots should take this into account when they’re trying to program a high rate of descent through an altitude band that will experience a large increase in tailwind. If the pilot begins the profile at a vertical speed that equates to idle descent at max forward speed, and then experiences a groundspeed increase, the aircraft may not be able to stay on the VNAV path without exceeding redline speed or needing to use speed brakes.
If having the VNAV system compute an angle to follow is like selecting a lateral course to intercept, VNAV direct is what it sounds like—the vertical version of direct-to navigation. We are asking the system to navigate directly to the defined BOD. The VNAV system selects a profile angle that will result in the TOD point being located at the aircraft’s current location, or a very small distance in front of the airplane, so the pilot has time to set up the airplane for descent.
ATC doesn’t always assign crossing restrictions that coincide with waypoints; modern VNAV systems handle this contingency well. Using the along-track waypoint function, a pilot given the clearance to cross 20 miles west of ABC at 12,000 feet inserts a fix into the flight plan located 20 miles either before or after ABC, whichever corresponds to west of the fix. Once this fix is in the flight plan, the crossing restriction can be entered with it, as if it were any other waypoint.
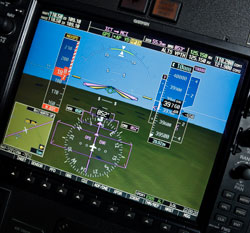
Once a VNAV profile has been created, the PFD will display several new pieces of information as the aircraft approaches TOD. First is the vertical deviation indicator (VDI), the glideslope-like display that shows aircraft altitude relative to the computed profile. Second is a graphical, and sometimes numeric, display of vertical speed required (VSR). VSR is the dynamic (continually updated) rate of VS, based on current groundspeed, which would be required to bring the aircraft from its current 3-D position to BOD. So if a VNAV profile is created that won’t require descent for several minutes, the VSR will be a relatively low number, as beginning a descent early will require a more shallow angle.
The VSR is typically displayed on the PFD’s vertical speed indicator (VSI) as a magenta bug. This allows for intuitive VNAV scanning; if the actual VSI needle is nestled inside the VSR bug, the airplane is descending on profile properly. If the VSI needle is above the bug (VS is less than VSR), the VDI will move down, while VSI below the bug will cause it to move up. After a pilot has practiced scanning this information in the airplane several times, it can be quickly assimilated into a big picture of what the aircraft is doing relative to the VNAV profile.
Estimating VNAV
For pilots without a VNAV-capable FMS, and for those who like to keep a close watch on what “the box” is doing, some simple trigonometry provides a quick mental-math version of VNAV. A three-degree descent angle, in addition to being the standard ILS glideslope angle, is also a comfortable en route descent angle. If we break out a scientific calculator, we see that to track a three-degree descent path, we will travel forward a bit more than 3.1 miles for every 1,000 feet of altitude lost. To keep things simple, we’ll simply call it three miles.
Using this knowledge, to determine how far away from an assigned crossing fix to start descending, simply multiply by three the thousands of feet that need to be lost. For example, a pilot cruising at 40,000 feet is cleared to cross the ABC VOR at FL240. The required altitude loss is 16,000 feet, so multiplying 16 by three, the pilot must start a descent 48 miles from the VOR to cross at the correct altitude.
The pilot’s work is not quite done. Because a fixed angle through space is being tracked, the vertical speed required to stay on the three-degree path will vary with groundspeed. Multiplying groundspeed by five will give the required vertical speed—for example, a light jet flying at a groundspeed of 400 knots must descend at 2,000 fpm to stay on path. As winds and airspeed may change in the descent, it’s often prudent to add a few hundred feet per minute to the VS if trying to make a crossing restriction solely by mental math.
The final piece of information displayed on the PFD is the target altitude associated with the active VNAV profile. Displayed next to the box showing the pilot-selected altitude, this information becomes important during operations with the autopilot engaged. Today’s light jets feature autopilots able to couple to the VDI as accurately as to a glideslope. Where the autopilot’s VNAV mode differs is that, unlike GS mode, it looks for an altitude at which to level off. This altitude will be the higher of the altitude entered into the altitude preselector or the active VNAV target altitude. The implication is a pilot wishing the autopilot to follow a VNAV profile will need to change the altitude preselector to the desired level-off altitude in addition to arming VNAV mode, otherwise the autopilot will not descend.
Where VNAV can truly shine is in the terminal environment when several descents need to be chained together in close succession. This situation would most commonly be encountered on nonprecision approaches with multiple step-downs, or “descend-via” STARs found at some of the nation’s busiest airports.
Most of these procedures are stored with associated VNAV altitudes preloaded. One caveat here is that many STARs contain one or more notes to “expect” clearance to cross fixes on the arrival at given altitudes. These types of altitudes typically are not found stored with the fixes, and must be entered manually by the pilot.
The LOC DME-E into Aspen, Colorado, illustrates how using VNAV on a high-workload approach can save the pilot quite a bit of effort. Arriving from the east, aircraft are cleared to the Red Table VOR to begin the approach, and then must complete five altitude changes over the next 17 miles. Without VNAV this requires changing the altitude preselector and engaging a vertical mode for each of the stepdowns, along with corresponding power and configuration changes. Several of the stepdowns are less than two miles apart, so the pilot is rushed to make the correct changes, increasing the chance of error.
With VNAV much of the work can be preloaded, leaving the pilot free to monitor correct execution. With only one change of the altitude selector, and one button-push on the autopilot, the aircraft will manage descent so as to cross each fix at the appropriate altitude, in succession. The pilot needs to manage power, to keep airspeed appropriate. Having flown this approach in light jets both with and without VNAV, the difference in workload is remarkable.
It is especially important to know the particulars of the VNAV system as it relates to approaches. Garmin G1000-based systems will only provide VNAV to the fix preceding the FAF if the approach features any type of vertical guidance (an ILS, LPV, or LNAV with advisory vertical guidance). If the approach has no vertical guidance (VOR, LOC), Garmin will allow for VNAV to, but not beyond, the FAF. In contrast, the Collins Pro Line system featured in larger light jets allows for VNAV past the FAF for many approaches—all the way to MDA, effectively turning many nonprecision approaches into precision-like procedures.
Neil singer is a Master CFI with more than 7,200 hours in 15 years of flying.
That beautiful banana
Anyone who has flown any length of time knows, for a fact, that Murphy was a pilot—most likely a pilot of a glass-cockpit aircraft. All the sophisticated lateral and vertical guidance that turbine aircraft avionics systems are capable of delivering come with a price—the necessity of paying very careful attention to button pushing, lest that guidance go bad. 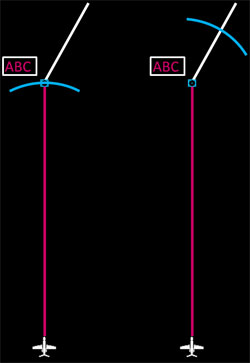
VNAV programming sometimes requires more button pushing than is needed to load an approach, so any backups that can be employed should be welcomed. Fortunately, both of the avionics systems found in new light jets, the Garmin G1000 and the Rockwell Collins Pro Line 21, incorporate a feature beloved by many pilots—the mighty “banana.”
Properly called the selected altitude intercept arc, the banana is a small arc (that looks like a banana) drawn on the MFD’s moving map that shows where along the aircraft’s lateral track the selected altitude will be reached. The location of the banana is determined by the aircraft’s current groundspeed and vertical speed, and so will move along the flight plan legs as the pilot alters speed and/or descent (or climb) rate.
The beautiful thing about the banana is that it’s a completely passive information system. As long as the pilot has elected in the MFD menu to enable the feature, it requires no pilot input to serve as a double-check of VNAV programming. If clearance is received to cross the ABC VOR at 12,000 feet, the pilot simply ensures that once the autopilot has started the descent in VNAV mode, the banana is sitting exactly on top of the ABC VOR symbol. If the banana appears after the VOR, something is amiss, and the pilot should recheck the VNAV programming as soon as possible.