Remaking a middle-aged Cessna 172—on a budget
Every airplane reaches a point at which it no longer becomes practical to keep. The cost required to keep it viable among more modern replacements becomes higher than it’s worth. Beyond that point, restoring an airplane becomes a labor of love in which practicality goes out the window and owners tread into showpiece territory.
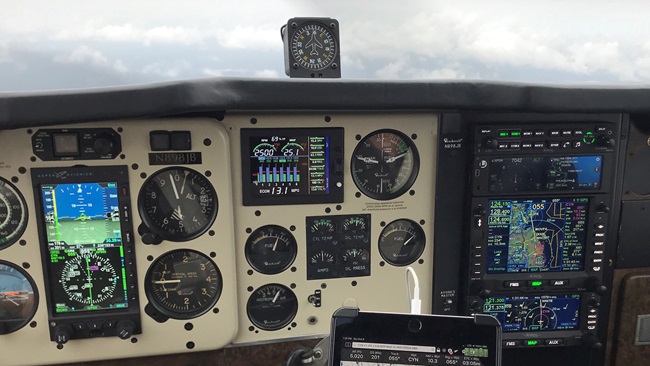
My brothers and I fell into the former category with the airplane in which we all learned to fly, a 1975 Cessna 172M that my father bought in 1981 and we continue to operate. Like many 40-year-old airplanes, it had a laundry list of items that loomed on the horizon like avionics, interior, windshield, and engine overhaul. In addition, there’s the fact that our airplane requires biennial baths in corrosion treatment, a byproduct of the fact that it has spent the majority of its life tied down outdoors.
While tearing into the airplane for an extensive annual inspection, we dropped the aft headliner and found a horrid-looking sight of surface corrosion on the interior of the roof skin. This area is unreachable by corrosion sprays and was one reason we wanted to take a thorough look. Realizing we may have reached a turning point in the history of this airplane, we turned to some expert help in helping us to determine whether the airplane was worth keeping or not.
Dennis Wolter of Air Mod in Batavia, Ohio, has written an informative series of articles about corrosion in light airplanes that appeared in magazines published by the Cessna Pilots Association and the American Bonanza Society. They are shared on the Air Mod website and are a must-read for owners of legacy airplanes. Air Mod has restored hundreds of airplanes spanning decades where each job goes more than skin deep and involves repairing and treating corrosion problems just like ours.
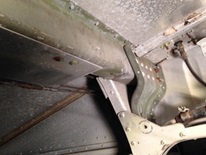
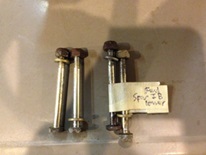
Turns out, our corrosion’s bark was worse than its bite. According to Wolter, the amount of surface corrosion was not unusual for a Cessna of this vintage and could be easily removed and treated—albeit with a lot of elbow grease. Perhaps the critical assessment of whether our 172 was still viable was to inspect the wing spar carrythrough bolts. These long but thin bolts aren’t holding the wings on (those bolts are much bigger); they simply hold the spar web structure together. The heads and nuts were visibly corroded, but what really counted, according to Wolter, were the shanks. If the shanks were rusted, then corrosion has infiltrated the spar-web structure, likely consigning the airplane to a salvage yard in the near future.
Luckily, the shanks of all bolts in the forward and aft spars looked good and structurally, that meant our old Skyhawk was in decent shape. With that know-ledge, we pressed on with putting labor and money fixing our old steed to keep it viable for another 40 years (hopefully).
We attacked the cabin roof with Scotchbrite pads to remove all of the surface corrosion, a very laborious job in cramped quarters. After removing the corrosion and cleaning the bare metal with lacquer thinner, we applied a few coats of zinc-phosphate primer to prevent future corrosion in this area.
Next up was to take care of the aging, cracked plastic of the airplane’s original interior. For years, Cessna owners have battled the factory-supplied Lustran plastic that adorns the interiors of these airplanes. Extremely light but also extremely brittle, the plastic gets faded by sunlight and stained by water leaks.
While there are replacement interior plastics from sources like Vantage Plane Plastics, they aren’t cheap and the labor to install these parts can be equally high. The new parts come untrimmed and void of any screw holes, since there’s lots of variability in these airframes. You and/or your mechanic will need to trim the parts and drill your own holes for the screws, which can be a real chore.
With that in mind and to keep things somewhat within budget, the plan was to repair all but one of our plastic parts, which was beyond repair and replaced for a not-insignificant $80 plus shipping. To replace all of the plastic of a typical mid-1970s Skyhawk interior, one would be facing a bill of around $1,500 for parts alone.
Repair of the plastic was accomplished by removing all of the offending parts and using epoxy to repair cracks from the back side. Once all repairs were made, we repainted the interior facing sides of the parts using SEM Coatings’ special Cessna-colored plastic paint. It was a laborious task, but the end result looks good and the holes are already drilled since the parts were removed from our airplane.
Like every refurb project, ours was full of hiccups and frustration. In fact, there were several moments when I regretted not looking into selling our 172 and replacing it with a more modern version. All Cessnas built since the piston line was resurrected in 1996 come with factory corrosion-proofing, largely eliminating the potential for corrosion like that we found above the headliner. And speaking of the headliner, I’m not sure there is a more frustrating job than reinstalling a headliner into a Skyhawk. It is a true test of patience that had me stand in awe of the Cessna workers who installed them daily—and the many interior shops that continue to deal with these maddening jobs every day.
And then there are the plastic pieces. You really begin to rethink your sanity after spending a half a day just to properly reinstall a single rear-window surround. While most of our stuff was original and at least had the holes drilled in the right places, the fitting process is time consuming and delicate. One wrong move and snap, there’s a new crack for you! And you’d be loathe to overtorque any screw that holds the old plastic in place. That’s a surefire way to start new cracks as well.
In all, our largely do-it-yourself project took more than 100 hours of labor and reinforced the fact that interior shops that perform jobs like this are likely charging fair prices. It’s just up to the owner to decide whether it’s worth dropping big bucks into an old airplane. For us, it was largely a matter of dropping copious spare time into the labor and covering the cost of some parts.
Unless you possess a mid-level or higher mechanical expertise and tool chest, and can spare a substantial chunk of your free time tinkering at the hangar, this is a job best left to an interior shop. It’ll just come down to the economics of whether it’s worth the money for your particular airplane and what it’s worth to you. Wolter reminded me that doing this job was saving an airframe. If it weren’t for us doing the work to this particular Skyhawk, someone else would’ve had to do it soon. And if they didn’t, it would likely be salvage yard time.
For us, for better or worse, we’re committed now. This was a huge job and we’re not even done. Seats, sidewalls, and a windshield are up next, and that means removing the headliner and plastic around the windows again—thrill! Owning a middle-aged airplane isn’t for the faint of heart or wallet, but they definitely are still viable amongst today’s modern airplanes, especially if you can swing doing much of the grunt work yourself.
Pete Bedell is a pilot for a major airline and co-owner of a Cessna 172M and Beechcraft Baron D55.
The author’s 1975 Cessna 172M had spent much of its life tied down outdoors.

That meant rust and corrosion were among the challenges …
… faced when planning the aircraft’s restoration.