The ILS visual transition
Catching a view of the approach lighting system (ALS) means you can continue an ILS approach, but the transition from flying on instruments to searching for the runway can pose big dangers, especially at night. Illusions and misidentification of other lights on the ground can lead to disorientation when you’re low, slow, and configured for landing.
In the last installment of “On Instruments” (April 2015 AOPA Pilot), we left off at the final approach fix inbound and gave some advice on how to best track the localizer and glideslope indications along the final approach course. But that’s just one element in flying a safe ILS—especially as you get closer to the runway.
Configuration control
For the safest approaches and transitions to landing, it’s best to fly stabilized flight paths. This means configuring the airplane so you fly each approach at a constant airspeed and descent rate. With practice, you can memorize the steps.
As a hypothetical example, a typical high-performance piston single might be slowed to 110 knots or so prior to ILS intercept. This might involve a power reduction to about 17 inches of manifold pressure with one notch of flap deflection. Once the localizer is centered and the glideslope needle is one dot above the bull’s-eye, the landing gear should be lowered, and a power reduction to 15 inches of manifold pressure should bring the airspeed to 100 knots. Maintain this configuration all the way to decision height, then make further power reductions so as to arrive at the runway’s aiming bars at the proper landing speed.
For a typical light fixed-gear piston single, a power setting of 1,600 rpm with one notch of flaps ought to yield a 90-knot approach speed. But whatever you fly—even if it’s a jumbo jet—the goal is the same: Fly a consistent configuration. Once you set up the airplane, you’re free to devote your energies to tracking the ILS. You don’t want to be fiddling with the power and flaps as you get closer to the surface, flying in the murk.
The transition to visual
The tension ratchets up the lower you descend on the ILS. Your pitch and heading corrections become smaller. Your altitude is about to reach decision height (the minimum altitude to which you can legally descend without seeing the runway environment). And let’s say the weather is at minimums. While your eyes are glued to the instrument panel, you keep sneaking peeks outside in hopes of seeing the approach lights and runway ahead.
There are several types of approach lighting systems (ALS) that can help, and you should have a familiarity with all of them. They can range from those with sequenced flashing lights (the “rabbit”) that lead you to roll alignment bars and runway end identifier lights (the most elaborate is the ALSF-2 lighting system), to simpler ones with more modest flashing light systems (such as the MALSR).
Whatever ALS you face, you must be able to see it—or the runway threshold, the runway touchdown zone, the runway lights, the visual approach slope indicator (VASI), or other visual cues that make up what’s defined as the “runway environment”—before you can continue your descent to landing.
Moreover, you can’t legally descend below 100 feet above the touchdown zone elevation using the ALS unless the red terminating bars or the red side row bars also are visible and identifiable. Although this last rule would technically apply only to those shooting Category II ILS approaches—the ones with 100-foot decision heights—this article addresses only Category I ILSs. There are six other different ILS systems and procedures (see “Tracking Tips,” facing page), all with lower minimums than the Category I. (The Category IIIc ILS doesn’t even have minimums; it’s for airplanes equipped with autoland.)
If you can’t see any of the visual elements mentioned, then the option is clear: Perform a missed approach. The danger is that in low-visibility situations you can become disoriented by confusing visual cues: A few streetlights on a nearby road; a parking lot that looks like a portion of an airport; a line of stopped cars, their lights burning through the fog. Pilots have been tricked into descending toward what they were convinced was a runway ahead, or one they were hoping mightily would soon appear—with disastrous consequences.
ALSs, parts of ALSs, outer markers, compass locators, runway lights, glide-slopes, and navaids can fail—and when they do there’s a penalty. In the case of lighting outages, minimum visibilities go up, but decision heights do not. Notams will fill you in on any inoperative components of ILS systems, and Jeppesen publishes the altered minimums right on the approach chart. With government approach charts, these are found in separate inoperative components tables published in the front sections of each approach book.
Volumes have been written about the ins and outs of ILS approaches. There’s a lot to know, and regular practice is a must. But completing a demanding ILS approach in instrument meteorological conditions is among the most rewarding flying experiences a pilot can have.
Email [email protected]
Illustration by Kevin Hand
Tracking tips
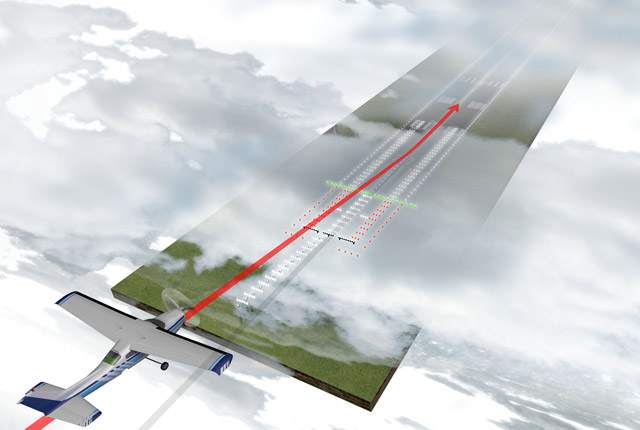
How much heading correction is needed to intercept or track a localizer needle that has drifted off center? When using an HSI, turning to an intercept heading that matches, or slightly exceeds, the needle’s deflection is a good rule of thumb. The needle’s movement should slow at first, then come back towards the central “bull’s-eye” of your HSI. This works in most situations, but if there’s a really strong crosswind you may have to hold a heading that’s more directly aligned into the wind.
And as crosswind components change, so will your heading corrections. Make your heading change, and then watch for needle movement. Is it moving back to center too quickly? Then reduce your intercept angle by half, for starters. Does the needle still seem stuck on an off-course dot? Then turn a few more degrees toward it. —TAH