AOPA Online Members Only -- Aviation Subject Report -- Traveling With Children and Family: Hearing Protection for Young Children
Traveling With Children and Family
Hearing Protection for Young Children
By Paul Horner
Sport Aviation, December 1995
It is common knowledge that many activities involve high levels of noise that can eventually lead to permanent hearing loss. Unfortunately, flying is one of those activities which may contribute to hearing loss if some form of protection is not used. My wife, Teresa, uses a headset while flight instructing, and I wear one when piloting the family Taylorcraft.
When our son Benjamin was born, there was no question that he would be flying on a somewhat regular basis. Soon after his arrival we searched for children's hearing protection. We were not able to locate anything suitable for use by young children anywhere. All of the "Mickey Mouse Ears" were too big, having been designed for adults. The disposable foam ear plugs were also too large for an infant. The idea of cutting them down with a gasket punch was discarded, due to sanitary concerns. Also, his mother and I did not like the idea of sticking something inside of his ears. When unable to find a commercially available product we designed our own.
The flying cap we designed is easy to make, and is surprisingly effective at reducing noise. The fact that it is in the form of a cap with the cups inside is an advantage with a youngster. With the cap securely tied on, little fingers are not as likely to remove the hearing protectors.
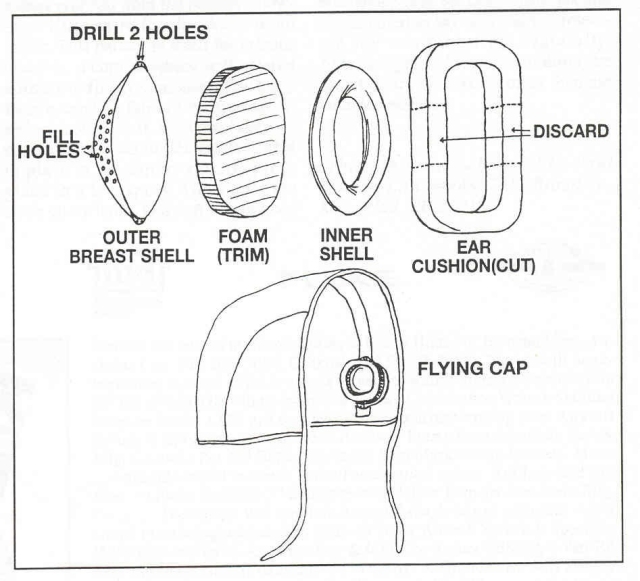
The cost for this project should not be over $30 if all of the materials are purchased. Naturally, with some scrounging, the cost can be held way down. The cap is based on McCall's pattern #6899. This pattern has several designs for infant wear, including a cap somewhat reminiscent of a WW-1 flying helmet. The ear "cups" are Breast Shells. Breast shells are a type of plastic prostheses used by some nursing women. They may be obtained through medical supply houses, the obstetric ward in hospitals, and possibly through some of the larger pharmacies. The ear cushions and acoustical foam come from adult size ear protectors, cut down to fit.
The breast shells should be assembled first. The brand we used is made by Ameda/Egnell, although several companies produce them. Be sure to select a brand that has a small tab on each end. At least one brand has only one tab. Each shell comes with three parts: a deep outer piece and two styles of backs. We chose to use the back with the largest opening. This allows the child's ear to be protected without rubbing. You will need to decide which one is most suitable for your use. On the larger shell piece are two small tabs on opposite ends. Drill two small holes in each tab in order to sew the shells in place. The large shell has a number of ventilation holes. Fill the vent holes with silicon rubber and smooth it out on the inside. Obtain the foam liners used inside a pair of adult ear protectors or headset. Trim them to fit snugly inside of the large half of the shells. With the foam inside, snap on the shell back.
The ear cushions are added next. New replacement foam cushions are obtainable from dealers who sell ear protectors, or you may rob some from an old set. The foam cushions from your adult size donor headset are cut down. Although the shells are round, and the cushions may not be, this will not make any difference. Cut a section from the middle of each one. Put a dab of silicone to the cut ends, and stick it to the back of the shells around the hole. It may be necessary to use a little glue to ensure that they stay in place. Once you have assembled both ear pieces, hold them up to your ears. You should hear that they cut noise considerably.
To help size the cap, hold the now assembled ear protectors in position on the child's head. Measure from tab to tab across the child's head. You will need to know how long to make the strap the shells are sewn to. Choose the proper size cap from the pattern, allowing a little extra for the shells to go inside. This pattern is sized for infants, however, a copy machine will enlarge it nicely to fit any youngster. Sew a cap from a suitable fabric (we used an interlock cotton knit, with airplanes, of course). The strap for the shells is held in place in the cap by stitching it in place in a few spots. The shells are sewn on by hand. Our son's flying cap uses two ties to secure it. Be sure to fashion it so that your child will not be able to remove it, or move the earpieces from over his ears. The final step is the fun part — a flight test!
This cap seems to provide a level of hearing protection for small children not obtainable elsewhere. The use of this design is at the user's own risk and is presented as my solution to protecting my son's hearing. Naturally, Ameda/Egnell does not condone the use of their products for other than the intended purpose.
The hint was submitted by Paul Horner, EAA 94948, 7511 Broad St., Rural Hall, NC 27045.
Reprinted with permission of the Experimental Aircraft Association; Sport Aviation.