
From takeoff to touchdown, every flight requires climbs and descents. Obvious, yes, but the ever-present nature of climbs and descents only makes it that much more important that we get the ups and downs right.
The key to making great climbs and descents is the ability to sense a deviation from the desired performance of the airplane, and then to make the required adjustment without relying on cockpit instrumentation.
To establish a climb, increase pitch attitude by applying back-pressure on the control yoke while simultaneously advancing the throttle to increase engine power. The amount of power and the pitch attitude chosen will be based on several factors, such as terrain, how fast you want to get to your planned cruising altitude, and visibility over the cowling. In training airplanes, a good rule of thumb is to add full power for a climb of more than about 300 feet.
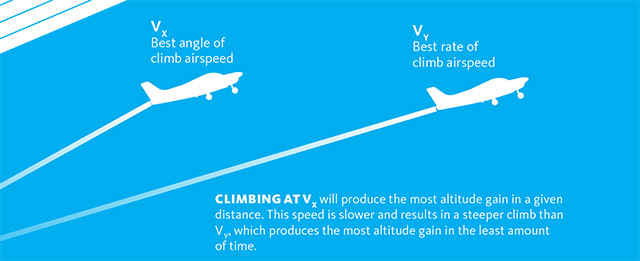
If you want to gain the most altitude in the least amount of time, the best rate of climb (VY) airspeed should be established. If you need to gain the most altitude in the shortest distance, the best angle of climb (VX) airspeed is appropriate. This airspeed is lower than the best rate of climb airspeed and is normally used to avoid obstacles after takeoff.
Flying at a slightly higher airspeed than the best rate of climb provides increased visibility and should be considered after an initial period at VY if traffic awareness is a concern. This airspeed is often called the normal or cruise climb airspeed. Know these airspeeds before you enter your climb. They can be found in your pilot’s operating handbook.
Back-pressure should be applied on the control yoke with the fingers. Avoid grabbing the yoke with both hands. Smooth throttle control is important. The throttle should be advanced evenly, not shoved or forced open abruptly. Once the desired power setting and pitch attitude have been established,
airspeed is maintained with the appropriate back-pressure on the control yoke.
As the desired power and pitch attitude are established to enter a climb, right rudder should be applied to prevent the aircraft’s increased tendency to yaw to the left. Pressure on the rudder pedals should be applied with the balls of the feet, with the heels resting comfortably on the floor. As you apply pressure on the right rudder pedal, pressure on the left pedal should be relaxed proportionally. The rudder pedals are interconnected and act in opposite directions.
Getting a feel for it. Flight instruments are useful for verifying the parameters of climbs and descents, but the best tools at your disposal are your hands, feet, eyes, and ears.
As you begin a climb, maintain outside visual reference to the natural horizon. The airplane’s wings and nose make excellent reference points for this. Once you’ve established the airplane’s attitude in relation to the horizon, refer quickly to the instruments and confirm the desired performance of the airplane.
These instrument checks should be made only to determine if an adjustment is required, not while the correction is made. “Chasing the instruments” is a common mistake that results in excessive attitude and airspeed corrections. Instead, develop a
correlation between outside visual references to the horizon and what the instruments are indicating. An attitude adjustment may be nearly imperceptible on the instrument panel but obvious when referencing the natural horizon.
Pay attention to how the rudder pedals and control yoke feel when you apply pressure. As airspeed decreases, the amount of pressure that must be exerted on the control surfaces—and the lag between their movement and the response of the airplane—increase. As you develop a feel for the controls, you will be able to estimate with increasing accuracy your current airspeed and which way your airspeed is trending without need for instrument reference.
During the transition from straight and level to a climb or descent, you’ll feel G forces that make you sink down in the seat (in a climb), or rise against the seat belt (in a descent). This feeds into that “fly by the seat of the pants” expression that originated in the early days of aviation. Pilots lacked fancy instruments to help them fly the airplane. They had to fly by feel. G forces help pilots do just that. (You also can feel when the turn coordinator’s ball is not centered.)
Feel how your body reacts when a climb is established, as compared to a descent, and how changes in airspeed and pitch attitude feel throughout your body. As this skill is developed, you’ll likely be able to detect even the slightest change in airplane performance—and make the necessary correction immediately.
For any substantial climb, use trim when the climb attitude has been established. This will reduce fatigue and abrupt attitude adjustments. A common mistake students make is controlling the airplane with trim adjustments and not establishing the desired pitch attitude prior to trimming. When approaching the desired cruise altitude, initiate a level-off at an altitude within 10 percent of the current climb rate (for instance, 50 feet below the desired altitude for a 500-feet-per-minute climb). This distance allows a gradual decrease of the pitch attitude. Once level, maintain the current power setting until you reach the desired cruise airspeed. Then, adjust the throttle to the appropriate cruise power setting and trim the airplane.
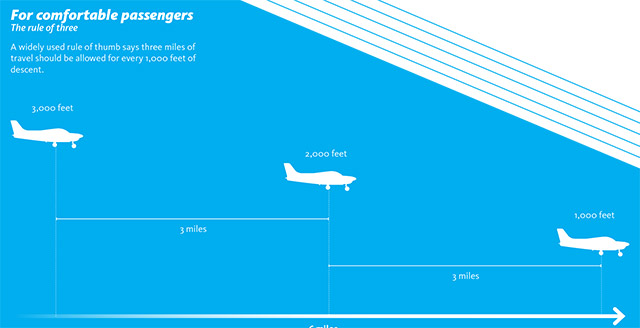
Before establishing a descent, it’s important to know what type of descent you want to perform. The most common, often called the en route descent, is established by reducing power and decreasing the pitch attitude to a target descent rate of 400 to 500 feet per minute. This descent usually is established when approaching the destination airport and a descent to traffic pattern altitude is necessary. You’ll want to calculate the point at which you should begin a descent. You don’t want to wait too long and descend too rapidly—that will create discomfort for your passengers’ ears. And pulling back the power to idle and pointing the nose steeply to get down could shock-cool the engine.
As with climbs, descents should be established and maintained using outside visual references in relation to the horizon. Instrument checks should be made only to confirm the airplane’s performance. Corrections, if necessary, should be made by outside visual reference to the horizon and then rechecked with quick glances at the appropriate instruments. Trim should be applied once the desired performance has been established.
Engine noise during a descent, as well as in a climb, also can help to develop a feel for the airplane. The sound of the engine in a climb is different from that in a descent, as the loss of rpm in a fixed-pitch propeller is especially noticeable. The sound of the air rushing past the cockpit also makes a distinctive noise. As airspeed increases, the sound of this rushing air will increase. The airplane’s frame may also vibrate during a climb or descent, most notably before the onset of a stall, providing yet another sound that helps to estimate both airspeed and the current trend in airspeed.
When transitioning to level flight from a descent, apply the same rule as in a climb. Gradually increase pitch attitude and power to the desired cruise setting as you approach the desired altitude, and lead by 10 percent of the current descent rate.
Inability to sense changes in airspeed through sound and feel is common, especially among student pilots. But this skill can be developed over time if the student makes a habit of trying to sense what the airplane is doing without the use of the flight instruments. Then you’ll really be flying by the seat of your pants.
Related Articles


