Stand your ground
Ground reference maneuvers help you tame the wind

Ground reference maneuvers require you to divide your attention between airplane control and orientation, scan for traffic and terrain, maintain coordinated flight, and compensate for wind to maintain a ground track—all while relatively low to the ground. You’re performing ground reference maneuvers every time you fly a traffic pattern, maneuver to let a passenger take photographs of a landmark, or circle your house.
Many examiners wait for airport traffic pattern work and landings to assess how you counteract wind while flying a rectangular course. That leaves either the S-turns or turns around a point for the air-work portion of the practical test. The Airplane Flying Handbook (FAA H-8083) outlines what the FAA expects during each maneuver. It also gives you the latest information for answering questions from the examiner in the oral portion of your test.
To perform any ground reference maneuver, you must know the direction of the wind and have a reasonable estimate of its strength. You’ll know that at takeoff, but maybe not in the practice area. Blowing smoke or dust, blowing grass or other vegetation, flags, and waves on a large body of water can be used to determine wind direction. FAA publications indicate “pennants” and “streamers” are also good indicators, but when is the last time you saw either? You’ll need to maintain altitude to within 100 feet and the speed to within plus or minus 10 knots of the aircraft’s maneuvering speed.
You’ll normally enter the maneuver with the wind at your back (downwind), but be aware the examiner can ask you to enter from any direction. While ground reference maneuvers are generally flown between 600 and 1,000 feet above the ground according to the Airplane Flying Handbook, an examiner interviewed for this article said he prefers 1,200 to 1,600 feet agl. Six hundred feet is less safe and not neighborly if there are farms or homes nearby, he said. An examiner may surprise you mid-maneuver with a simulated engine failure, so keep a landing spot in mind.
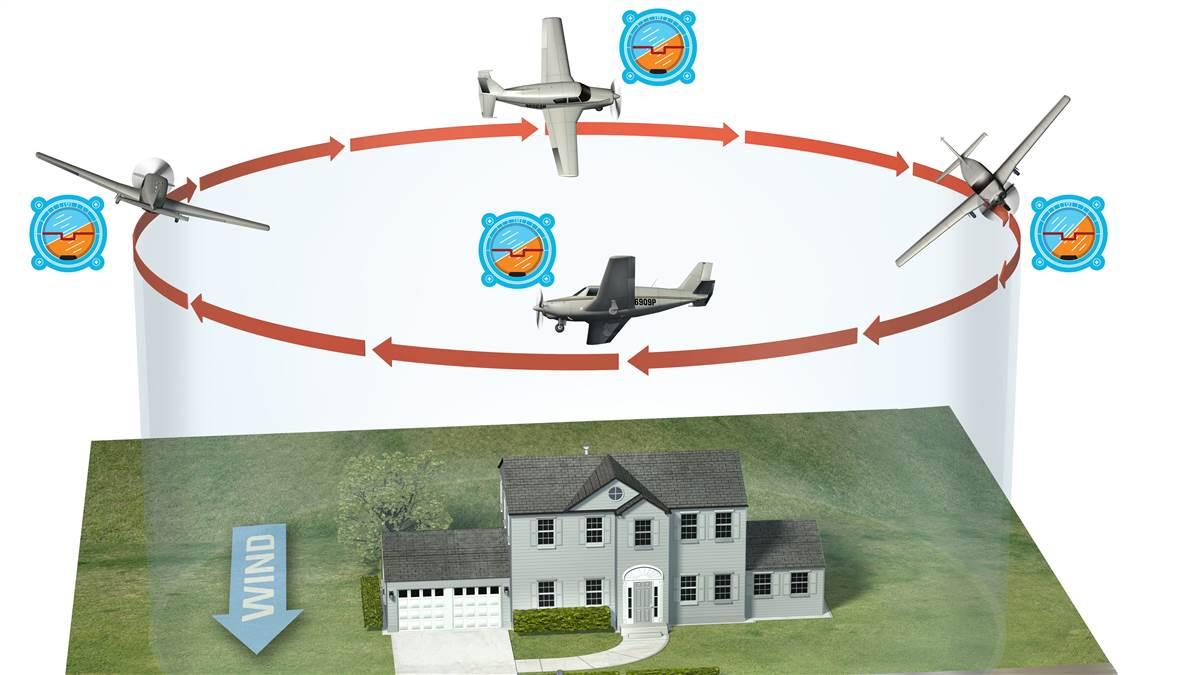 Turns around a point
The objective of turns around a point is to fly a constant-radius circle around an object. Pick something prominent, like a barn in a field, a water tower, or something else that’s easy to see with a quick glance. The first step in performing turns around a point—or any ground reference maneuver—is to make two 90-degree clearing turns to look for conflicting traffic. Your speed must not exceed the maneuvering speed of the aircraft.
What if there is no wind? If this is your lucky day, just set the initial bank angle (not to exceed 45 degrees) when abeam the chosen point and wait until the circle is complete. You’re done! The radius will remain constant.
That seems unlikely. Most likely, you’ll need to vary the bank angle and heading because of wind to stay on your imaginary circle—usually about a half-mile in diameter. As you enter you’ll have an airspeed of, say, 100 knots plus a tailwind of perhaps 10 knots for a total groundspeed of 110 knots. That means you will need to briskly apply the maximum bank angle you intend to use the second you are abeam the point.
As you round the first quarter of the circle, the wind tries to drift you away from the center, stretching your circle into an oblong shape—but the examiner wants to see a perfect circle. So you apply a change in heading slightly toward the inside of the circle; this is the wind correction angle. If you were in a boat crossing a swift stream, you would have to aim the bow upstream if you want to end up on the opposite shore at a point directly across from your starting point. Similarly, you must turn into the wind to correct for drift in an airplane. Aileron and rudder inputs must be coordinated—no skidding around the turn to achieve a wind correction angle.
In a turn, the angle of the wind from the airplane is constantly changing, requiring the pilot to change the bank angle throughout the turn. As you continue the turn, the aircraft’s groundspeed is now dropping because the wind is no longer directly behind you. Less bank angle is now needed, but keep the wind correction angle. At a point 180 degrees opposite of the entry point the groundspeed is now 90 knots and there is no drift—just a headwind, so the bank can be shallower but not zero degrees (you are still flying in a circle). At this point, you will have the shallowest bank of the turn.
During the entire maneuver you must demonstrate that you continue to scan for conflicting traffic. In the third quarter of the circle the wind is trying to blow you toward the center of the circle. Where should you place the nose? It should point outside the imaginary circle—your new wind correction angle. As you round the fourth quarter of the circle, the bank angle slowly increases to the same angle you used on entry as you cross the entry point. Whew! Aced it.
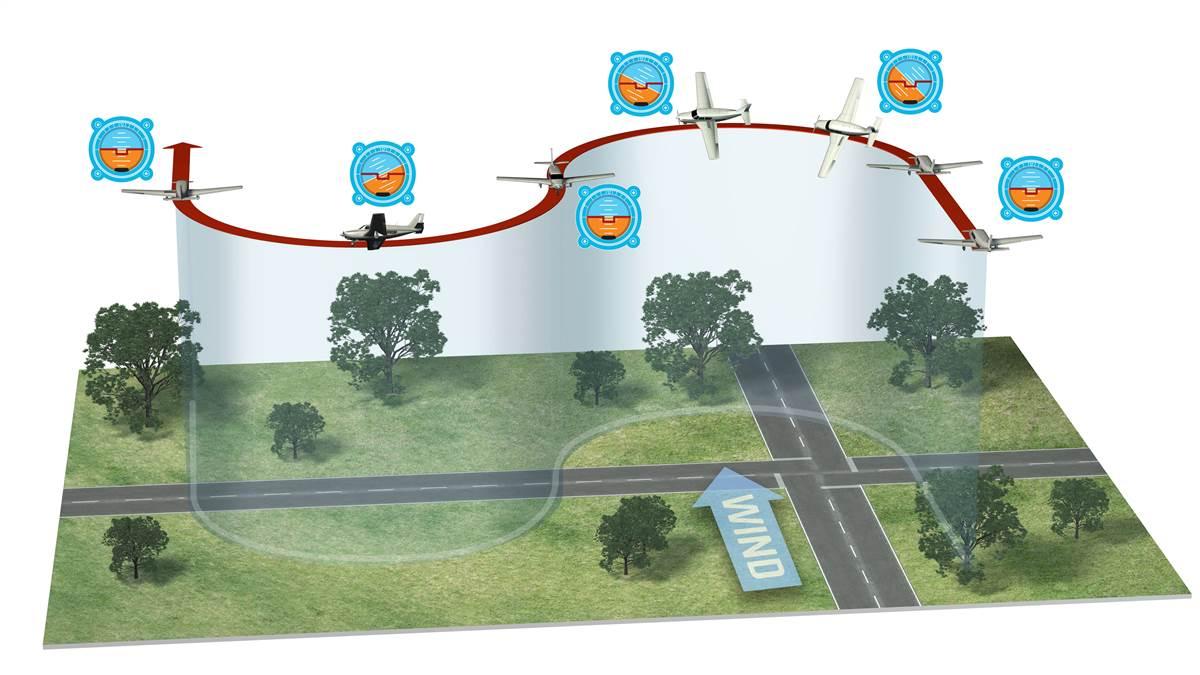 S-turns
This time you don’t need a small point such as a tree or water tank; you need a reference line such as a road or a fence. The maneuver is similar to turns around a point but differs as you reverse the direction every time you cross the reference line. The first step is once again to make two 90-degree clearing turns to scan for conflicting traffic. Then you approach the reference line with the wind behind you (downwind) and begin the first turn when directly over it.
As with turns around a point, you can anticipate the examiner may declare an engine-out emergency at any time. You must demonstrate you are scanning for conflicting traffic as you perform the maneuver.
There are four indicators of success. You must cross the reference line just as the turn is completed. You must be wings level when above the road. You must immediately begin a turn in the opposite direction. The half-circles must be the same size despite the wind trying to make the downwind half-circle large and the upwind half-circle small.
The method of correcting for the wind is the same as for turns around a point. The fastest groundspeed occurs when you cross the reference line with the wind behind you, so here’s a question: Should your bank angle be steep or shallow? A briskly applied steep bank angle will keep you on your imaginary half-circle.
At the 90-degree point you should have a wind correction angle established to avoid being blown too far from the reference line. At the 180-degree point, what should the bank be and why? It should be shallow because your speed is now slower, and you will gradually add a wind correction angle into the wind. Completing the second half-circle above the reference line, wings are level for a few seconds and there is no wind-correction angle because the wind is once again directly behind you. Just keep making equal half-circles until the examiner says to stop.
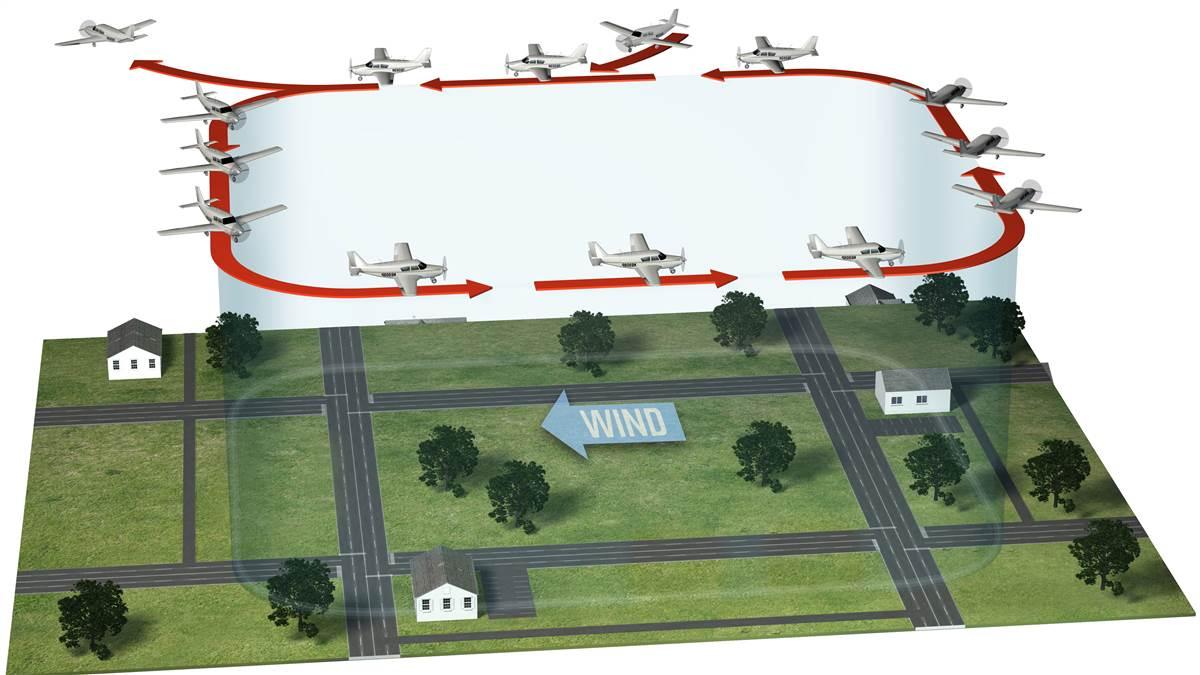 Rectangular course
Now we come to a maneuver with a more obvious purpose: traffic patterns. The rectangular course maneuver is even entered, after two clearing turns, at a 45-degree angle just like a traffic pattern. The goal is a rectangle with 90-degree corners. Fields and road patterns may provide good reference rectangles.
If the downwind and upwind (imaginary runway) sides are perfectly parallel to the wind, then you will only need wind correction on the rectangle’s two ends (crosswind and base), but that is obviously unlikely. Wind correction, that angle between the desired ground track and the actual heading of the aircraft, will be needed on all four sides. Once you know the direction of the wind you can plan for the turns. If the wind is at 90 degrees to the long side of the rectangle, for example, plan to point into the wind on both of the long sides and directly parallel the short sides. The downwind turns happen faster, which means a shallower bank will be required on the upwind to crosswind turn to keep you from getting too far inside the rectangle, and a steeper bank is required on the crosswind to downwind to keep from being blown too far outside the rectangle. The final two turns go in reverse, with a steeper bank on the downwind to base turn and a shallow bank on base to the original leg (simulated final).
Remember to make all turns using coordinated aileron and rudder. Keep the turn coordination ball or indicator in the center so that you are neither skidding around turns nor slipping into them. While you are making sure your turns are coordinated and wind corrections are keeping you on the desired ground track, don’t forget to scan for traffic. With all that going on remember the examiner might suddenly ask you to simulate an engine failure. Where are you going to land? Keep a spot in mind.
While all the maneuvers sound like multitasking (they are, intentionally so) be aware that one examiner said it is rare that pilot candidates fail the ground reference maneuvers. Once you are aware of the wind direction and what it is trying to do to you, ground reference maneuvers provide one more purpose: They are fun to fly.

Related Articles


