Quit playing chase
Tune up your stick and rudder skills with better rate control

Elmer Sperry pondered a similar question in the early 1900s while working on the first autopilot ship for the U.S. Navy. Sperry noticed that the best captains were sensitive to the rate of change of heading and used the rate of motion as a basis of control movements to control the ship’s heading. He subsequently designed rate control into his ship’s autopilot. That autopilot, known as Metal Mike, became an important control system in World War I battleships.
Everyone is familiar with position control systems. For example, the room thermostat: If the room gets too cool, the heater comes on until the room is too hot, and then turns off. More sophisticated industrial systems measure how fast the temperature is approaching the target and start slowing the rate to settle out on the target temperature. This is still position control but using the rate of change of the parameter being controlled to set the position at the target parameter.
 How does this apply to flight control? If you fly analog gauges you have pointers that show airspeed, rate of climb, rate of turn, and more. These, in general, should never be swinging faster than a second hand moves. Glass panels also have pointers as well as numbers that tumble when they are changing. You should sense this during your scan, or even with a quick glance. There is no need to read the numbers—just a sense of the rate and direction of change is required.
Consider the airspeed. If you can sense movement with a quick glance, things are changing too fast. Make a small opposing correction as you continue to scan or look out the window if you are VFR. Next, glance if the movement has stopped and you need to reposition it a bit—only a very small correction, but not while staring at the airspeed indicator. It takes some time to change so you are better off looking at where you are going rather than at the airspeed indicator.
From my observation of many pilots, the turn onto final is where this control problem often manifests itself. As the rollout onto final is made, most often with a little extra speed, the pilot pulls back to slow down. Now the airspeed—while still a little fast—is falling off. Out the window, all looks good, but the airplane is not stable; while losing speed, it is not descending at the expected rate. Next, the pilot notices that the airspeed is too low and lowers the nose. Then it is obvious that the profile is falling short of the runway and more power is needed. This continues to a lesser degree until flare starts. If it was a checkride and the airspeed excursions were inside the airman certification standards’ wide tolerances, the pilot would pass, and would be safe enough, just not very smooth.
In the scenario described above using rate control, you would notice you are a few knots fast, and rather than pulling back, the reaction would be to add a little back-pressure—just enough to start a downward airspeed drift. Flying glass, it would be just enough to start to roll the airspeed numbers. On the steam gauge, you should just see a little movement on the airspeed indicator. Now it’s eyes back outside, hold the little pressure increment, and wait. After a few seconds, a glance back at the airspeed should show that you are approaching the target. Upon reaching the target airspeed, relax about half of the added back-pressure increment. That should bring the rate of change down to zero near your target airspeed. It is important to make these small increments of pressure while looking out the window, if you are VFR, or the attitude indicator when IFR. If the change even shows as a pitch change, it is too much—back off.
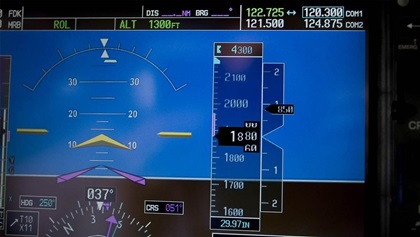
 When flying glass panels, little magenta colored snakes peek out and show the rate of change. It is a shame that such important parameters got such a small portion of the display. Still, they are useful if you can get a sense of what they are showing without spending too much scan time trying to figure them out. But these little rate indicators are derived by a calculation. So, the rate change has been going on for some time before the processors can generate the display. You should strive to be sensitive to the same motions on the primary displays that generate the rate displays. Rate control is about a sense of rate of change, not so much the actual numbers. This is also true for a standard-rate turn when on the gauges. Control the rate of change and you can stick it where you want.
Most of this discussion has been about using rate control for pitch. Pitch is more subtle and requires a finer touch than roll. But the same techniques apply to roll. The roll cues are bigger and more obvious. Flying visually, your whole world is moving when you are rolling. On the gauges it is more subtle, but still right there in front of you. Especially on glass. The horizon line goes all the way across the screen, so you should be able to pick up its motion even out of your peripheral vision. The only time these cues should be moving is when you are purposefully changing the bank angle. Like the airspeed, this is best done looking out the window, or if on instruments at the attitude indicator.
A potentially lifesaving reaction stems from a heightened sense of rate control. During an upset—or as it is known on a checkride, unusual attitude—sensing accelerating airspeed should trigger an immediate action to level the wings followed by just enough back-pressure to halt the acceleration. This is signaled by the reversal of the airspeed pointer and by the reversal of the vertical speed pointer.
Rate control should be used for all your control actions. Learning rate control may require a change in old habits. But the rewards will be much improved stick-and-rudder skills. Initially, it may require too much head down time, so find an instructor who understands what you are trying to accomplish and work with him or her. You will find that once you have mastered it you actually spend less time on the gauges. The ability to sense an inadvertent rate of change and react to control the motion is all you need to become a smoother pilot.
Related Articles


