Wx Watch: Ice advice
Action items for the icing season

Photography by Andy Potts
Check the CIP and FIP (Current and Forecast icing products). After obtaining a thorough preflight briefing, you should check these preflight tools on the Aviation Weather Center (AWC) website, which provide graphic depictions of icing locations, intensity, and probability. The forecasts go out 18 hours and cover altitudes from 1,000 feet to Flight Level 290. Locations of the most severe, large-droplet icing are identified with red stippling. Along with the site’s graphical forecast tool, it’s the closest thing to one-stop shopping for bringing yourself up to speed on the synoptic icing situation. The AWC also posts—under the Advisories dropdown menu—graphical airmets (G-airmets) that delineate the horizontal and vertical extent of icing conditions plus freezing levels, along with other airmets for convective activity, high surface winds, low-level wind shear, turbulence, IFR conditions, and mountain obscuration.
Know icing types and temperatures. Rime icing—whitish accretions on an airframe’s leading edges—is created by small-droplet conditions. Clear icing is transparent and caused by large droplets. Supercooled large droplet (SLD) conditions are the worst because they splatter and then run back on wings and other surfaces, where they freeze and can interfere with the airflow over control surfaces. Each type of icing is associated with temperature ranges. It’s easier to think of them in Celsius. Clear ice happens in visible moisture between plus-5 and minus-10 degrees Celsius; rime, between minus-10 and minus-20 degrees Celsius; and SLD icing occurs within a few degrees of zero degrees Celsius. Mixed icing is a blend of clear and rime, and hovers around the minus-10 degree Celsius mark.
Watch your OAT. Pilots generally ignore the outside air temperature gauge. That’s a big mistake when flying around icing conditions. If you’re flying in cloud or visible moisture and see the OAT drifting toward the icing range, this is often your first warning of potential icing.
We’ve learned that the worst place to be flying is in cloud tops, where moisture contents are highest.“Visible moisture.” Sure, clouds, rain, snow, and fog qualify as visible moisture. But what if there’s reduced visibility in moisture at the surface, or beneath or between cloud layers, and you can still see through it? A consensus has emerged that if the visibility is at or below one statute mile, you have visible moisture.
Steer clear of clouds. Non-instrument-rated pilots must do this anyway, but pilots on IFR flight plans should also keep their distance, and minimize any time in climbs or descents in instrument conditions. We’ve learned that the worst place to be flying is in cloud tops, where moisture content is highest. If ATC assigns you an altitude that puts you at or near the top of a cloud layer, negotiate an exit to a higher or lower altitude. Often, an altitude change of just 2,000 feet can get you out of icing conditions.
Avoid frontal weather and risky regions. Cold, warm, or stationary, they all imply rising air masses, clouds, lowering temperatures—and the probability of icing. A cold front’s cumulus clouds favor clear icing; warm fronts are known for stratus clouds and rime icing, owing to their smaller water droplet sizes. Warm-front weather can extend up to 500 miles ahead of the surface frontal position, and clear icing can occur in the clear air ahead of the front, as comparatively warm rain falls into the retreating, colder air ahead. SLD icing is known to be most prevalent in certain geographic regions near large bodies of water: the areas around the Great Lakes, New England, and the Pacific Northwest.
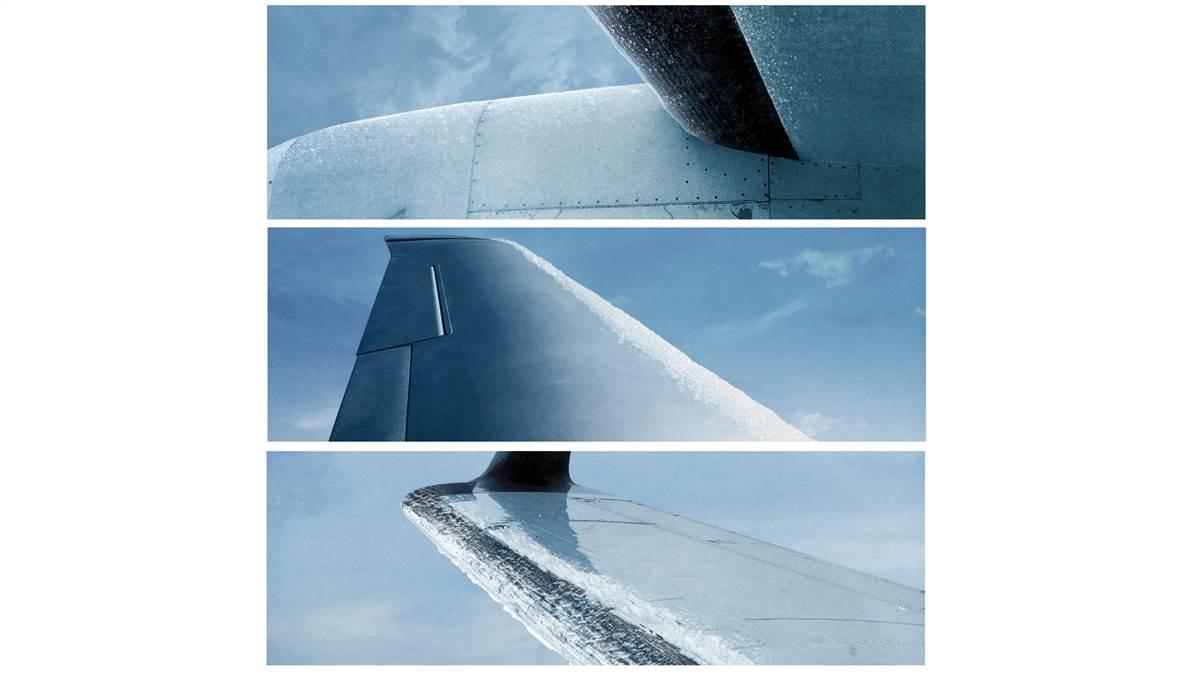
First signs. Ice accretions can be seen on the wing leading edges (use a flashlight at night, or the ice inspection light of an airplane certified for flight into known icing [FIKI] conditions) but the very first signs that you’re starting to ice up will be on small-radius objects, like the OAT probe, rivet heads, wing steps, hinges, or windshield posts. Large-radius wing leading edges take a while to ice up—depending on conditions, of course—while smaller-radius leading edges, like those of a Mooney, accrete ice more rapidly. As for signs you’re in SLD conditions, look for large droplets splattering on the windshield and running aft, ice crystals mixed in with the droplets, and/or ice accumulating on unheated side windows or their corners.

From ‘trace’ to ‘Severe’
A look at the effect of ice-accretion levels
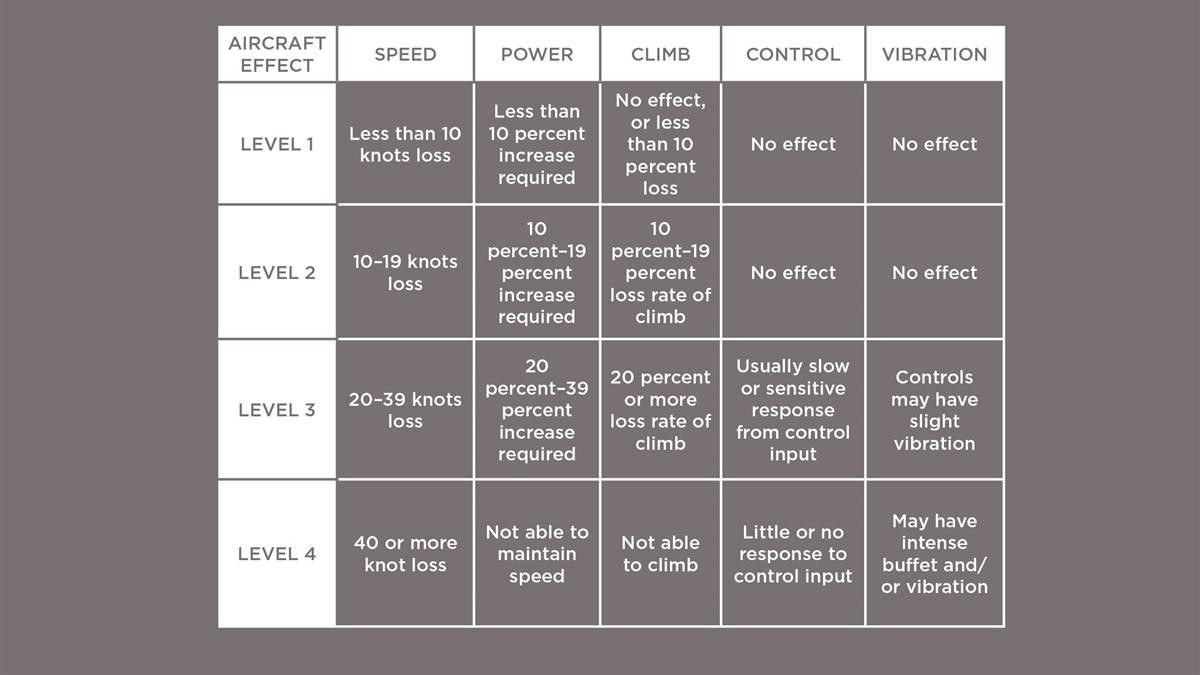
The current trace-light-moderate-severe icing definitions have been around for decades. But in the past, several other scales, based on specific performance degradations, have been advanced. In 1998, an FAA workshop came up with this proposal. The “Aircraft Effect” levels roughly correspond to trace, light, moderate, and severe icing conditions in ascending order.
You’re not helpless. OK, let’s say the worst has happened and for whatever reason you’re icing up. Even if you’re flying a non-FIKI airplane, such as a Cessna Skyhawk, you have tools to deal with the problem. Your pitot heat should have been turned on when you first noticed visible moisture, but if you haven’t, do it now. Using carburetor heat or opening the alternate engine air door can prevent ice accumulations from starving the engine of air. You should have a com radio to call ATC or flight service for assistance, or to declare an emergency if need be—in which case, squawk 7700 on your transponder.
Escape measures. If caught in icing conditions the first order of business is to fly the airplane. Keep airspeed up, and cycle the propeller rpms up and down to help rid the propeller leading edges of any ice accretions. Keep bank and pitch angles low. If autopilot-equipped, it’s best to turn it off and fly by hand to prevent ice from impeding movement of the flight control surfaces. Flexing the controls from time to time can also help in keeping control surfaces free. An altitude change of 1,000 or 2,000 feet may be all that’s needed to fly out of icing conditions. A climb to on-top conditions might work—as long as the tops are low enough to clear. A descent might also make sense, as long as terrain and obstacles aren’t factors and ceilings aren’t dangerously below VFR minimums. A 180-degree turn could also be a good strategy—as long as you can quickly return to ice-free conditions. Fly in “light” icing conditions long enough, and accretions may well reach severe levels.
FIKI-equipped? Have de-ice boots? Good for you. They can be a real help. Pilots have long heard that for the best ice removal, allow some—say, a quarter to a half-inch—of ice to accumulate before inflating the boots. But the latest guidance urges inflating the boots at the first sign of ice for the best results. Another issue is that some pilots believe that they can fly in ice no matter its intensity or duration—as long as their airplane is equipped with leading edge de-ice boots and other de-ice equipment. Not true. Having ice protection gear isn’t enough for all conditions. Some ice conditions—such as SLD icing—can be so severe that ice protection can’t keep up. Even FIKI-equipped airplanes are not certified for flight into severe icing. So think of ice protection equipment as giving you the time to safely escape icing, not as permission to fly indefinitely.
Landing. Hopefully, any icing encounter ends with a landing at the nearest suitable airport. During the descent to land it’s important to keep your airspeed up and refrain from using flaps. Higher than normal final approach speeds can offset the effects of any ice-induced drag, but flap deflections can cause tailplane stalls. That’s because the increased downwash of the air from the flaps causes increased airloads and higher angles of attack on the horizontal stabilizer—so high that a stall occurs. The result is an abrupt loss of lift. Remember that the tailplane surfaces generate downward lift. When a tailplane stalls, it rises and there’s a sudden, radical nose-down pitch—something that experience and flight test studies have confirmed.
Does contemplating any of this make you uncomfortable? Then all the more reason to get complete preflight briefings and make well-planned routes during the colder months.
Email [email protected]


