Using VNAV on an approach
Like gliding down an escalator
By Bruce Williams
When connected to GPS navigators such as the Garmin GTN series, modern autopilots like the Garmin GFC 500 and GFC 600 can use vertical navigation (VNAV) to fly smooth, precise profiles through a series of step-downs prior to the final approach fix during instrument approaches and while descending via standard terminal arrival routes (STARs).

Using VNAV is like gliding down an escalator instead of tromping down the stairs.
VNAV can reduce your workload during these busy phases of flight and help you comply with ATC clearances. Using it safely and effectively, however, still requires practice and attention to detail. Because VNAV precisely meets charted altitude restrictions, the feature also may suggest that you modify your techniques for flying stairstep descents, especially if you operate a high-performance aircraft such as a Bonanza or Mooney.
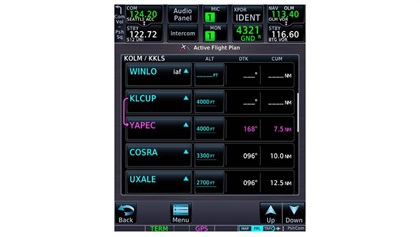
Consider the RNAV (GPS) RWY 12 approach at Kelso, Washington (KLS). You begin the approach at WINLO or ONALS, fly to KLCUP and then to the YAPEC intermediate fix, where the plan and profile views of the chart show three step-downs from 4,000 feet as you continue to cross ANIGE, the final approach fix, at 1,900 feet.
Each of those intermediate segments is only 2.5 nm long. Setting up a conventional descent using vertical speed to cross each fix at the appropriate altitude can be challenging. But a GPS navigator and autopilot that support VNAV profiles will guide you all the way down to the final approach fix (FAF) on a constant-descent path.
To use VNAV, when you are cleared to descend and join a published segment of an approach with step-downs, set the altitude bug on the primary flight display (PFD) to the lowest intermediate altitude that complies with your clearance. Or, if you’re cleared for the entire approach, set the crossing altitude published at the FAF. Select VNAV to arm that descent mode on the autopilot. The system will maintain the current altitude until you reach the point where the descent should begin.
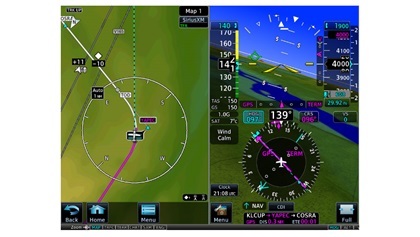
After you set a lower altitude on the PFD, the map view includes a top of descent (TOD) marker that shows where VNAV will direct you or the autopilot to start down; in this case, from 4,000 feet to 3,300 feet, soon after you pass YAPEC and join the leg to COSRA.
As you approach the TOD, the PFD displays a magenta VNAV cue (<) next to the altitude tape that you or the autopilot can follow, much like a GPS-based glidepath (GP) or ILS glideslope (GS), to each subsequent step-down altitude outside the FAF. As you approach the TOD, you will also hear a “vertical path” callout through the audio panel.
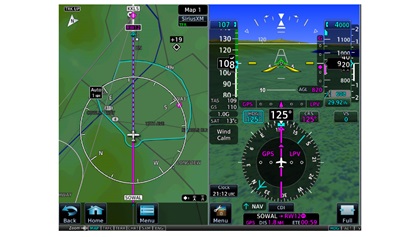
As you approach the FAF, Garmin PFDs also preview the glidepath or glideslope diamond in light gray.
To continue the descent as you approach the FAF, you must arm approach mode (APR)—remember that VNAV provides guidance only during the intermediate stages of an approach (or when descending via a STAR). With a Garmin GFC 500 or GFC 600, you can arm APR mode early—in fact, as soon as ATC clears you for an approach. When you reach the bottom of descent (BOD) and intercept the GP or GS, the VNAV cue disappears, replaced by a magenta GP or green GS diamond, and the autopilot seamlessly switches to APR mode to guide you to the decision altitude or MDA. This same sequence works whether you’re following approved vertical guidance to a DA or an advisory glidepath to an MDA when only LNAV minimums are available.
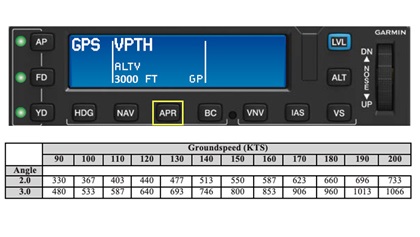 Following the VNAV cues smoothly and ensuring that you’re configured to land, however, involves more than just pushing the nose down. By default, VNAV creates a 3-degree descent path that ensures that you cross each stepdown exactly at the published altitudes. As the table below shows, that 3-degree angle can result in ear-popping descents in unpressurized airplanes, especially if you begin a VNAV-guided descent near normal cruise speed. While tracking the default 3-degree VNAV path, you may also have trouble slowing down to the appropriate speeds for extending flaps and landing gear as you approach the FAF.
When I started using VNAV, I quickly changed the default VNAV angle to 2 degrees. That shallower angle results in much more comfortable descent rates as I head downhill at typical speeds (150–180 knots) in my Beechcraft A36 Bonanza. You can change the default flight path angle (FPA) to suit your aircraft’s performance.
Even if you have adjusted the FPA, to avoid large or sudden power reductions when tracking VNAV descents you will probably want to slow down earlier than you might have in the past, especially if your airplane has low flap and/or landing gear extension speeds. I typically establish my initial approach configuration just before reaching the TOD.
 When the autopilot is following VNAV guidance, you can use the control wheel steering (CWS) feature to raise the nose and decelerate to flap/gear speeds, in effect mimicking the old-school technique of leveling off briefly as you approach a step-down fix or the FAF to slow down and configure before intercepting a glideslope. Pressing and holding the CWS button on the yoke temporarily disengages the pitch and roll servos without turning off the autopilot. When you release the button, the autopilot resumes tracking the previously set modes. Check the pilot guide for your autopilot for the specific details. CWS is also useful, for example, when you need to turn briefly to avoid traffic or steer around a cloud.
It’s also important to understand when not to use VNAV. For example, in busy airspace when ATC is sequencing you into the flow and managing your descent, VNAV may not be the best choice, because it flies segments of a procedure as published, both laterally and vertically.
But if ATC clears you to an initial approach fix or vectors you to join a segment at the published altitudes, VNAV can provide precise vertical guidance, giving you more time to prepare for and monitor a stable arrival and approach.
Bruce Williams is a flight instructor in Seattle, Washington.
Related Articles


